Building a battery powered bluetooth speaker
2022-10-18
There a countless blogpost, youtube videos or instructables on building a battery-powered bluetooth-speaker. A lot of them have fancy woodwork and painting in common, a few even utilize a dsp to act as a crossover. But they often just slap together electronic modules in a very basic way, and use simple passive crossovers. There is a lot more potential here.
What I have not seen so far is a high-power PA bluetooth battery speaker using dsp as an active crossover. So I decided to build one.
Design goals
The speaker is supposed to be portable, rugged, as light as possible, have a replacable battery, bluetooth, enough power for outside dance events and be dsp controlled. Novices have to be able to use it. Battery protection (undervoltage) is required. Speaker-protection is also required to prevent damage. It should also have a good, clean sound and some bass enhancement for lower volumes.
The Speaker
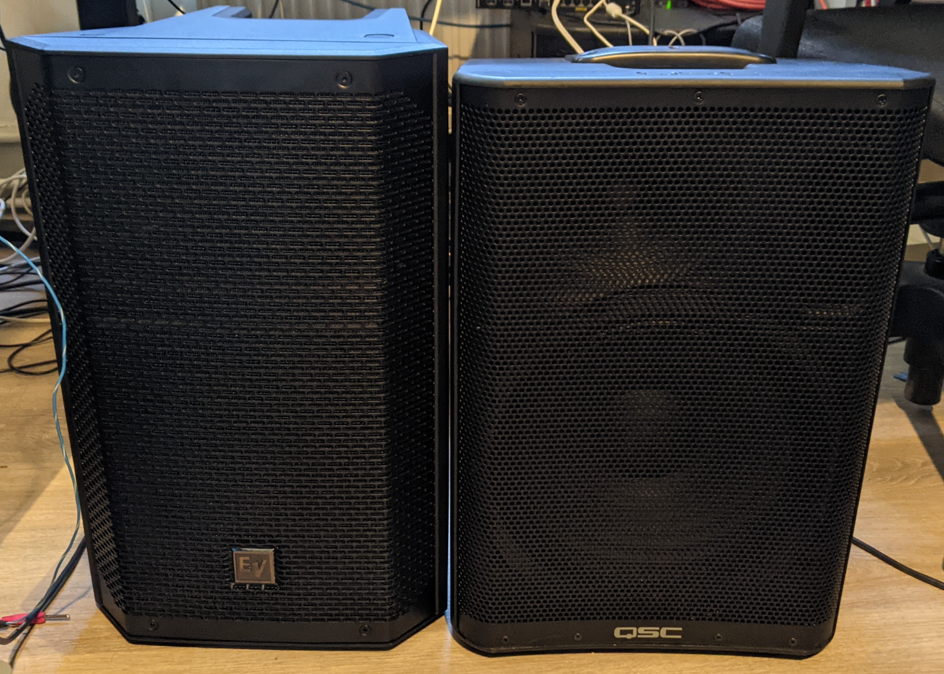
Designing and manufacturing a speaker box is quite an extensive task. As the goals for this project also include weight reduction, I decided to use a passive PA speaker from a reputable manufaturer and focus on the electronics.
The QSC CP12 (right), a nice compact active speaker would have been a perfect candidate, but modifying a 650 EUR speaker is a bit too expensive.
A passive version is not available either. After hours of research, i decided on the EV ELX200-10 (left).
Originally, I wanted to use the ZLX12, but the ELX200-10 specifications were more favorable, and it's a bit lighter (13.4kg vs 14.9kg of the ZLX12) despite the higher price of 330 Euros back in August.
Conveniently, it also fits inside the CP12s tote bag.
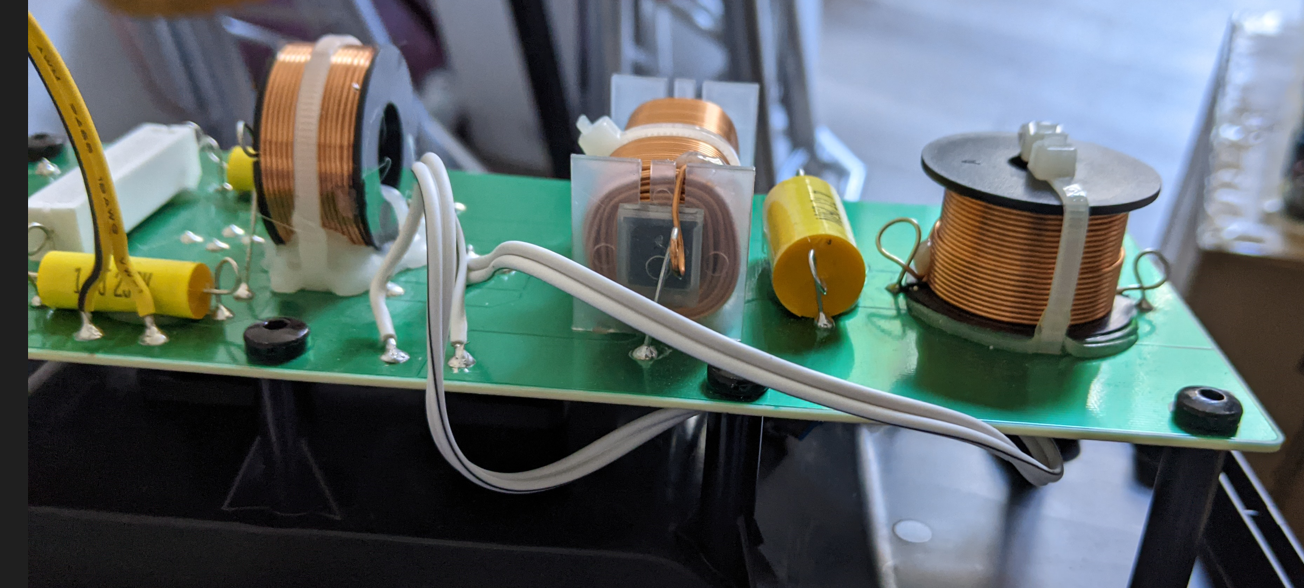
The passive crossover is on a large single-sided pcb behind the plastic rear cover. The active version of this speaker seems to use the same case, but just place the plate-amp in the same spot. I decided to first modify the passive cross-over for biamping using a switch (that connects the woofer to speakon pins 2+ and 2- instead of the x-over), before gutting it for the final version.
The crossover also conains 2 lamps for protection acting as a PTC on the tweeter. Those I kept, just in case.
One disadvantage of this speaker is that all screws are self-tappers in plastic. I try to avoid opening and closing it, and always try to find the existing thread by turning the screw backwards until I feel it click into the existing thread.
Amplification
A class-D 2-channel amp with at least 100W @ 8Ohms per channel and single-supply-rail is required. The Jab5 module from wondom fits perfectly for this project, as it can be run in a dual bridged mode, and also has the ADAU1701 DSP as well as bluetooth on board. At around 85 Euros including the cable set it is no-brainer for this box. Input voltage range is from 12-39V DC, so fits nicely. It claims 4x100W @ 6Ohms, or 2x200W at 6Ohms in BTL using a supply voltage of 36V. The speakers is rated at 8 Ohms, so power available will be less.
Power management
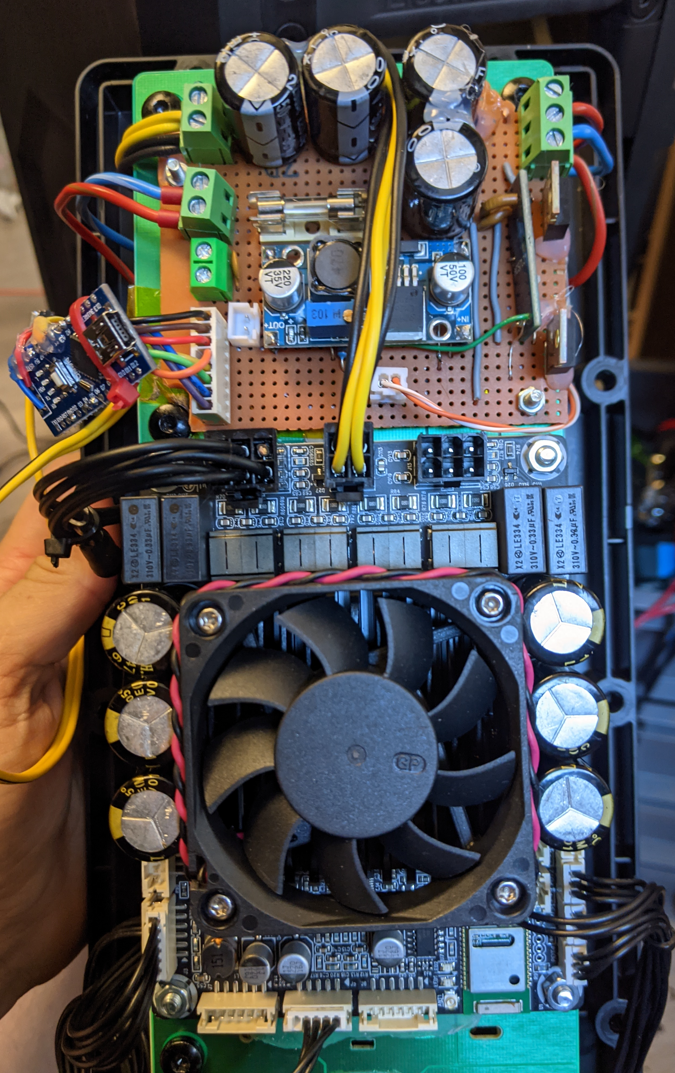
The battery of choice ia a makita 18V tool battery. It is very available, quick to charge and packs a good amount of power. 3D models are available to print mounts, and the contact-insert (Makita 643852-2 18 V battery contact plate) is also available online..
The amp board can run on 18V, but at that voltage with 8-Ohm speakers it lacks power. A simple step-up module from the online bookseller can be used to step up the voltage. I'm running the amp at 32V, that is a good compromise between power and idle-consumption. Measuring the consumption, it increases linearly with the input voltage. At this voltage, the amp consumes about 7W idle and with low volumes.
As the makita batteries do not have a built-in undervoltage-protection, I needed to implement my own in the speaker. Also, the speaker should not consume any power while it is off. I used a cheap arduino-nano clone as a microcontroller with a small oled display for status. The power button provides power to the microcontroller until it latches a p-channel mosfet to keep power on. This way, absolutely no standby power is used, and the microcontroller can turn it off completely when low-voltage shutoff condition is reached.
As soon as the microcontroller determines stable voltage conditions, it can turn on another mosfet providing power to a step-up converter powering the amplifier.
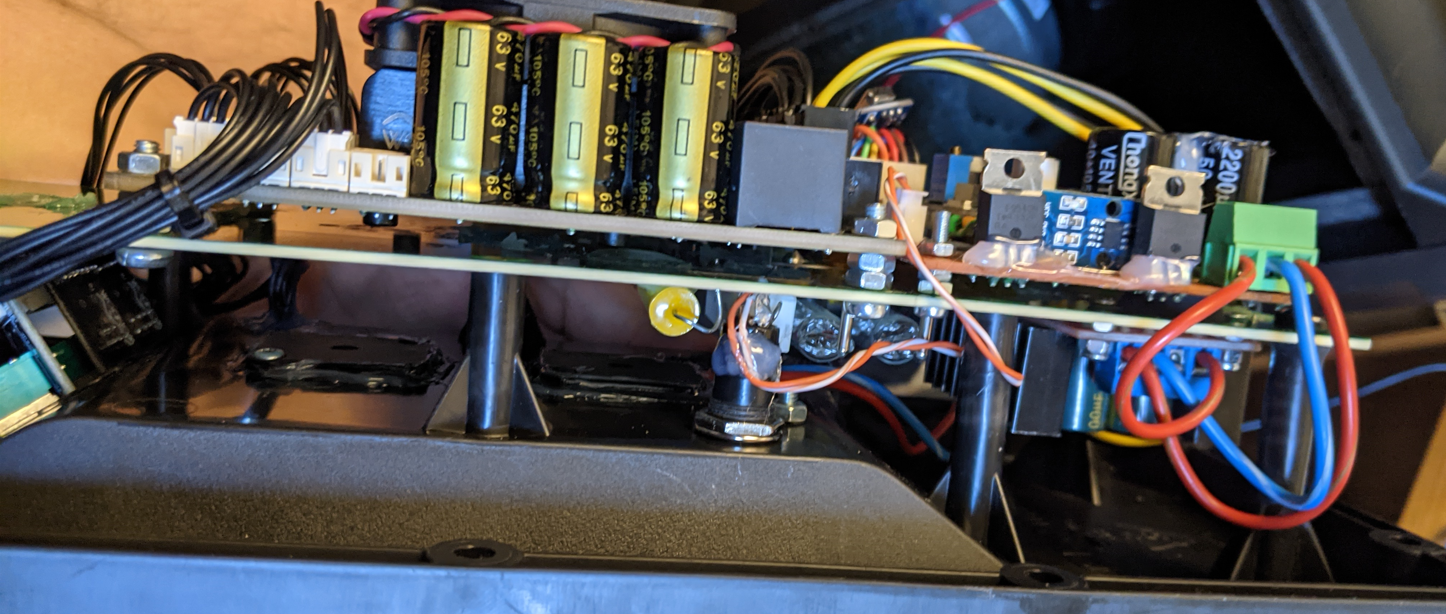
Side-View of the amp board mounted on the guttet crossover pcb.
- Top-left is the JAB-5 amplifier & dsp board.
- Top-right is the power management board with the power switch mosfets, 5V dc-dc converter for microcontroller, fuse, a lot of capacitance and voltage/current measurements.
- Bottom-right is the low-cost dc-dc boost converter claiming 400W. It converts the input 18V to 32V for the amp. Under normal operation, it does not get warm.
- Bottom-middle shows the momentary power button, a capacitor for the high frequency and the bulbs for speaker protection still in place from the original cross over.
- Bottom-left are the potentiometers for volume and a yet to be implemented function.
Back-Panel
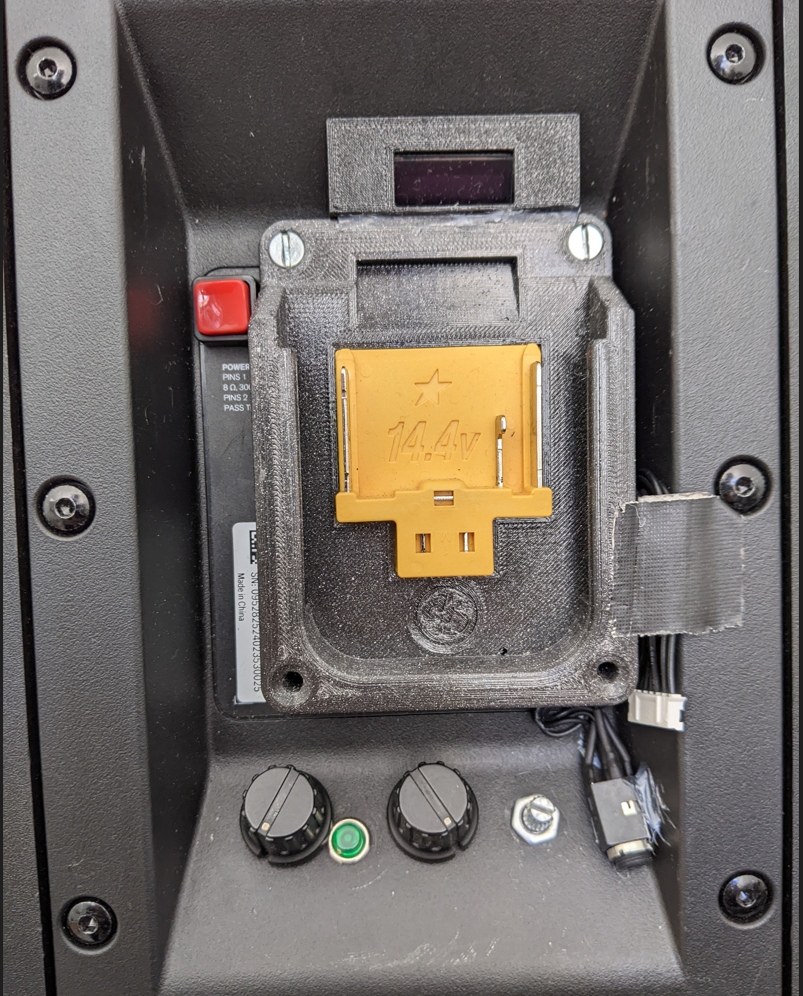
The back panel is quite simple. Battery plate, above a little oled showing the status of the speaker and battery, a power button, 3 pots: Bluetooth-volume, line-in volume, unused. The line-in is still the original mini jack from the JAB-5 kit, I plan to replace it with a proper XLR/minijack input in the future. The small green button next to the left-most pot is for unpairing bluetooth. Press it, and you can pair a different device. A cable for programming the dsp is also sticking out. This needs a better solution as well, for now it's tucked in next to the battery plate.
DSP programming
The dsp is based loosely on the original demo project provided by wondom. This version only retains the parameters for the dsp config, everything else changed.
Both inputs, analog (0, 1) and bluetooth (4, 5) are first summed and dc-blocked. A fixed gain stage is followed by a variable gain controlled by the pots using the axiliary adcs. These 2 signals are then summed and passed to a notch filter for reducing 600Hz with a Q of 1, then a 2-way Linkwitz-riley crossover block set to 1700Hz. The woofer gets a high-pass at 25Hz to prevent excessive cone movement below the ports resonant frequency, a small boost at 100Hz for more punch, dynamic bass boost below -24dB to create a fuller sound at low volumes, and finally a compressor/soft-limiter to prevent clipping before being split to the 2 DACs for the low-channel amp side.
The High-side gets a high-shelf at +1dB at 5kHz and a compressor/soft-limiter for protection as well before splitting to both High-channel amps.
Even though the amp is in Bridge-Tie-Load, the signal has to be the same phase to both channels as they are operated in parallel, not series. Inverting the signal of one output can kill the amp.

Usage and conclusions
I've used it a few times now for dance practice and outside dancing. The EQ and bass response varies widely in outside locations and gyms compared to my room at home, resulting in a bit too much bass in real usage. I've dialed it back since, thanks to the exposed dsp programming cable.
The big test is still outstanding: competing with swing music from about a hundred years against well-compressed salsa music from a JBL partybox 100. It fared ok using the preliminary external amp/crossover. Since completing the speaker, there was no outside dancing opprotunity.
It has been used as a floor-monitor for a small band at a dance party with around 60 people inside, the 2 QSC CP12 were used as main speakers, and this one for the singers monitor. As the battery was protruding too far, some pamphlets had to be stuck under the speaker to prevent it from resting on the battery. The singer was happy.
ToDo
Some things are still on my todo list:
- Measure the speaker
- XLR Inputs
- Power Input (DC)
- Accurate power measurements
Discussion
Hit me up on twitter to discuss: Twitter thread on this battery speaker
Last updated 2022-10-22
Aruba mPSK with Freeradius
2020-05-06
Many wifi-enabled devices intendet for home-users do not support 802.1x authentication. Some of those are increasingly used in enterprise wifi environments - be it universities, dormitories, or regular businesses with some nice shiny piece of IOT capable of wpa2-psk only. Some vendors solved this problem by implementing a proprietary authentication method to give each device a unique WPA2 preshared-key based on the mac address of the device, even allowing the use of a radius server to store these identities. Contrary to 802.1x (EAPOL) Authentication, both the client and ap need to be in possession of the correct PSK to associate and complete a 4-Way handshake. Therefore, the AP needs to know the exact PSK the client will use to connect. Some vendors store this information in the controllers or aps itself, others consult a radius server using the mac address of the client to retrieve the key. Another drawback of any private/multiple-PSK solution is that the PSK cannot be stored in a one-way hashed form, but needs to be available in plaintext.
Aruba recently caught up to other wifi vendors in offering a form of "private PSK" called mPSK (multiple PSK). It is advertised to be only usable using the Clearpass Policy Manager, however, it is implemented using the vendor specific radius attribute "Aruba-MPSK-Passphrase", and also works with freeradius (provided it is new enough). For details on this, see the entry on v0ttis wiki: Using Aruba MPSK with FreeRadius
Trying to implement it on ArubaOS 8.6, it did not work initially after adding a mpsk ssid in the browser and specifying the ip/secret of the freeradius server. As this wizzard does not allow adding a pre-exisiting radius server, I just entered any ip (it only accepted a legacy-IP address), and changed it to the correct IPv6 using the cli. The first test was not successful, though. Following a deep-dive into the configuration, I finally figured out the missing piece to get it working. This is an extract of the cli configuration for mpsk on aruba, using the ssid "internetofshit".
AAA profiles
aaa authentication mac "internetofshit_mac"
!
aaa authentication dot1x "internetofshit_dot1x"
!
aaa authentication-server radius "iot_radius_1"
    enable-ipv6
    host "{radius_ipv6}"
    key {radius_secret} authentication mac "internetofshit_mac"
	mac-lowercase
    mac-delimiter colon
!
aaa server-group "iot_radius_group"
    auth-server iot_radius_1 position 1
!
mac-lowercase and mac-delimiter are optional, but handy depending on the radius backend storage. The following aaa Profile is for deployments with a pefnd-license:
aaa profile "internetofshit_aaa"
    authentication-mac "internetofshit_mac"
    mac-default-role "authenticated"
    mac-server-group "iot_radius_group"
    authentication-dot1x "internetofshit_dot1x"
    dot1x-default-role "authenticated"
    dot1x-server-group "iot_radius_group"
!
If you do not have a pefng license, use this AAA Profile instead. It basically replaces the role 'authenticated' with 'logon':
aaa profile "internetofshit_aaa"
    authentication-mac "internetofshit_mac"
    mac-default-role "logon"
    mac-server-group "iot_radius_group"
    authentication-dot1x "internetofshit_dot1x"
    dot1x-default-role "logon"
    dot1x-server-group "iot_radius_group"
!
In my first attempt, the mac-server_group was set to default, which was, of course, not configured with any radius server. It is a good idea to leave the default profiles as-is, and create copies of them for modification.
VAP and SSID Profiles
wlan ssid-profile "internetofshit_ssid"
    essid "internetofshit"
    opmode mpsk-aes
!
wlan virtual-ap "internetofshit_vap"
    aaa-profile "internetofshit_aaa"
    vlan {default_vlan}
    ssid-profile "internetofshit_ssid"
!
Some useful commands for debugging (to be run on the controller):
show log user-debug 20
show ap client trail-info {mac}
aaa test-server pap iot_radius_1 {mac} {psk} verbose {mac}
I do like the method chosen by aruba: psks retrieved via radius for a specific mac. Some other manufacturers need to store all mac/psks in the ap, or have a single mac I have heard the controller caches entries for an amount of time.
Freeradius Config with Postgres-backend
Here are some excepts from the freeradius config.
policy.d/mpsk-vlan
mpsk-vlan {

    if ("%{sql:SELECT COUNT(*) FROM macauth WHERE mac='%{User-Name}'}" > 0) {
       update reply {
           Tunnel-Private-Group-Id := "%{sql:SELECT vlan_id FROM macauth WHERE mac='%{User-Name}'}"
           Tunnel-Type := VLAN
           Tunnel-Medium-Type := IEEE-802
           # https://github.com/FreeRADIUS/freeradius-server/blob/master/share/dictionary/radius/dictionary.aruba
           # https://wiki.v0tti.com/doku.php?id=blog:aruba-mpsk-freeradius
           Aruba-MPSK-Passphrase := "%{sql:SELECT psk FROM macauth WHERE mac='%{User-Name}'}"
         }
        update {
            control:Auth-Type := Accept
         }
     }
     else {
        update request {
            Tmp-String-2 := "M2V|Mac Address not in Database"
        }
        reject
     }
}
sites-enabled/mpsk add mpsk-vlan to the authorize section
    authorize {
        mpsk-vlan
    }
The sql connection details are in mods-enabled/sql
excerpts from the ansible-generated config from this role by Klara Mall: ansible-freeradius
If you do not want to deploy it using ansible, or just run a quick'n'dirty poc, you can download a tar of the freeradius config dir generated by the ansible role. This was only tested in an ipv6-only environment.
Last updated 2020-05-25
Systemd-units for prometheus exporters
2019-11-20
This is mostly documentation for myself. Systemd units for running exporters for prometheus not installed via apt.
Example for the very nice prometheus-junos-exporter by Daniel Czerwonk.
Systemd unit file located in: /lib/systemd/system/prometheus-junos-exporter.service
[Unit]
Description=Prometheus exporter for Junos devices
Documentation=https://github.com/czerwonk/junos_exporter man:prometheus-junos-exporter(1)
After=network.target

[Service]
User=prometheus
EnvironmentFile=/etc/default/prometheus-junos-exporter
ExecStart=/usr/bin/junos_exporter $ARGS
Restart=always
RestartSec=5s

[Install]
WantedBy=multi-user.target
Exporter Args: /etc/default/prometheus-junos-exporter
ARGS=" -config.file=/etc/prometheus-junos-exporter/junos-exporter.yml -ssh.keyfile={ID_RSA_path} -ssh.user=prometheus"
Exporter Config in /etc/prometheus-junos-exporter/junos-exporter.yml
targets:
  - router-hostname.domain

features:
  bgp: true
  ospf: true
  isis: false
  l2circuit: false
  environment: true
  routes: true
  routing_engine: true
  interface_diagnostic: false
  interfaces: true
QLC+ Fixtures for cheap ebay moving heads
2019-09-11
Some while ago I aquired some low cost moving heads from ebay to play around. Here are the fixutres I created in qlc+ for those.
I modded the relatively low-power units to contain a dc-dc converter and be powered from 24V DC on a 4-Pin XLR Cable carrying power and dmx. This makes it easy to daisy-chain those 4 Units for small parties.
RA Guard on Extreme Summit / Enterasys C3/C5 Switches
2019-03-14
Recently, I researched how to implement RA Guard on Enterasys/Extreme switches. The Summit X460-G2 and Enterasys C5G Series were in my Lab for testing the implementation.
Unfortunately, they do not provide a simple "switch-on" feature for ra guard, instead requiring a custom implementation using policy rules or ACL entries. It seems they do not protect against attacks with extensions headers in front of the icmpv6 header of the rogue ra. This does need testing, though.
RA Guard on Extreme Summit X460-G2
Create a file with the ACL named raguard.pol containing this ACL:
entry block_ra {
 if {protocol icmpv6;icmp-type 134;}
 then {deny; count RA_attack;}
}
then upload it to the switch and apply it to a port:
configure access-list raguard ports 48 ingress
The counters are accessible with:
X460G2-48p-10G4.28 # show access-list counter
Policy Name       Vlan Name        Port   Direction
Counter Name                   Packet Count         Byte Count
==================================================================
raguard           *                1      ingress
    RA_attack                      0
raguard           *                48     ingress
    RA_attack                      3
Enterasys C5G
This Switch series requires a fairly modern software version and policy support.
set policy profile 1 name raguard
set policy rule 1 icmp6type 134.000  mask 16 drop
set policy port ge.1.1 1
Both of these are the simplest versions, and they can be combined into larger policies / acls. I have also verified the effectiveness of the Enterasys policy on a trunk port for tagged vlans.
About Prefix delegation on L3 Switches
2018-07-20
While evaluating new switches for student dormitory networks, I decided it was time to try out Prefix delegation. We had already allocated a /56 for each tenant, and the only missing link was to hand them out. The relevant config on the router (ArubaOS-Switch) is:
As a positive aside, it was possible to run everything including firmware update via tftp on an ipv6-only network.
dhcpv6-relay

vlan 101
  name Room1
  ipv6 enable
  ipv6 address 2001:db8:c:101::1/64
  ipv6 address fe80::1 link-local
  ipv6 nd ra other-config-flag
  ipv6 nd ra router-preference high
  ipv6 helper-address unicast 2001:db8:a::8
And the isc-dhcp-server config for handing out /60 to requesting clients:
subnet6 2001:db8:c:101::/64 {
	prefix6 2001:db8:d:1000:: 2001:db8:c:10f0:: /60;
}
Attaching an openwrt router to the hp switch resulted in the prefix being delegated, but not useable since no route was installed in the routing table. Thus far, I've not found any way to get the hp to inject the prefixes received by the dhcpv6-relay into it's routing table.
This itched my curiosity, and I tried it out on a Juniper Router. With the config snipped
forwarding-option {
	dhcp-relay {
		dhcpv6 {
			group test-clients {
				active-server-group test-v6;
				interface irb.101;
				interface irb.102;
			}
			server-group {
				test-v6 {
					2001:db8:a::8;
				}
			}
		}
	}
}
Lo and behold, it worked first try and installed the route into routing table.
There are also some domitories routed using a Mirkotik CCR. So what about RouterOS?
A quick try using dhcpv6-relay yielded the same result as on the hp, prefix got delegated, but the router did not install
the route in it's routing-table. Since RouterOS also has a build-in dhcpv6-server I decided to give that a try. Using the config below worked.
/ipv6 pool add name=test-room1 prefix=2001:db8:c:1000::/56 prefix-length=60
/ipv6 dhcp-server add address-pool=test-room1 interface=test-room1 name=test-room1
Next up: Trying it out on a Whitebox Switch with CumulusLinux and PicOs. As for the ArubaOS Switch, I can only wait for tech-support to get back to me.
Evaluating Switches
2018-07-15
Sometime in May I got a HPE/Aruba 2530-8G-Poe Switch on my desk to evaluate as a new model for L2 Switching with poe. Since we have quite a few ProCurve switches in the network already, and a few of them are 2520-8G-POE, it was a bit boring until I discovered the new REST-API. Even better, I found out that several of our deployed 2620-48 Switches also support this API, although at a lower version.
The API is relatively simple, and requires the web-management to be enabled (preferably via tls). There is also some documentation available from Aruba, but it does not always explain the data schemes needed to send data via POST/PUT. There is also a nifty little exxample python project on github:
arubaos-switch-python
funny enough, it has some example functions exporting port statistics to excel (who t.f. does monitoring via excel?).
While it was relatively easy to get up and running with it, I did find one gripe: It does not support any IPv6 Addresses in the native API functions, although it has a data type distinguisher for IP Version 4 on all IP Addresses. The current only workaround is to use the anycli call to execute a cli command and parse the text-output. While this is still much better than ssh screen-scraping an interactive cli, it is a very annoying downside of the api. This is 2018, and IPv6 is the current internet standard. Tech Support does not see this as broken, so the only way to get it fixed is to put pressure on the sales channels.
More evaluations
Due to the discovery of the REST-API, HPE/Aruba Switches became interesting again for the next generation of dormitory switching routers.
So I ordered a demo of some 2540, 2930f and a 3810M Switches to test.
After arrival, I connected them up, and ran the test IPv6-only due to the simlicity:
- Enable ospf3 on the interfaces connecting the 2930f to the next router on the exisiting network (EX4600 in this case)
- Enable ospf3 and ipv6-unicast routing on the 2930f
- Add an unused prefix to a vlan on the 2930f.
A connected client to that routed vlan was quickly online. Then the fun started:
All pings to ipv6 addresses, contacting a sntp server, outgoing syslog and snmp failed. Some puzzled looks and cli-poking later I found the issue to be the outgoing source-address of traffic originating from the switch. The are options to set the preferred-source to loopback, but those options are only working for legacy-IP. The only way to get outgoing traffic working was to add a global prefix to the transfer net, giving up the nice and simple unnumbered setup. Additionally, snmp always responds using the outgoing interface, not the dst-ip of the incoming request, making it impossible to use the loopback IP for monitoring.
What about the competion?
The same setup on a Juniper EX2300C worked fine.
Cisco with legacy-IOS Switches is not an option, and they are going into a more expensive direction. So No.
Arista would be nice, but too expensive, and no poe.
Why bother with HPE/ArubaOS-Switch anyways?
Assigning a vlan to a port is very easy on ArubaOS-Switch, as well as changing the vlan. On Juniper, you need to delete the old vlan from the port, set the new one and commit. To change an access-port from vlan 2 to vlan 3, you would execute these commands on both platforms:
Junos:
delete interface ge-0/0/0.0 family ethernet-switching vlan memebers 2
set interface ge-0/0/0.0 family ethernet-switching vlan members 3
commit
ArubaOS-Switch:
interface 1 untagged vlan 3
## OR ##
vlan 3 untagged 1
While I'm pretty used to the Junos Syntax by now, I'm not the only teammember, and others do prefer the ArubaOS way. And they are quite affordable.